
Tutorial : How to Draw an Aircraft Paint Scheme
|
|
This tutorial is for those who want to design a paint scheme for their
aircraft but lack the basic skills necessary to draw one. Our goal is to
show you, with step-by-step instructions, how to draw an aircraft paint scheme.
This tutorial has 4 parts: Introduction to MS Paint, Beginning to Draw,
Intermediate Drawing, and Tips and Tricks.
We will use Microsoft Paint in this tutorial, but the same techniques learned here can be utilized
when drawing with any other paint program. |
|
|
|
PART 1: INTRODUCTION TO MS PAINT
|
Starting the Microsoft Paint program in Windows :
This is one of the easiest paint programs to use and it's perfect for learning how to draw on your PC.
To launch MS Paint, click on the Start button, select All Programs, Accesories,
and then select Paint.
In Windows 8, right click at the bottom of the Start Screen, select All Apps, then click
on the Paint icon.
|
 |
Classic MS Paint is the Paint app prior to Windows 7.
The image on the left is a typical Classic MS Paint program window. It contains the Menu bar on the top row and
below that are the Tools, a Color Palette and the Drawing Area.
The icons aligned vertically on the left side are the Tools we will use to draw with.
The color boxes aligned horizontally are part of the
Color Palette.
Below the Color Palette is the Drawing Area.
|
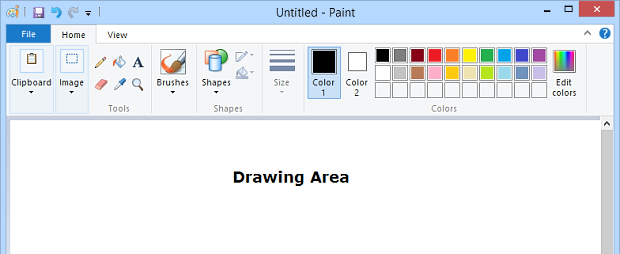
Starting with Windows 7, the MS Paint program window changed. Here, the Tools and
the Color Palette are merged together above the Drawing Area. See the image below.
|
The Tools in MS Paint :
Before we start to draw, there are a few basic tools that we need to learn. These are beginner's tools
and they're very easy to use. Other more advanced tools will not be discussed in this tutorial.
Let's begin with the tools in Classic MS Paint followed by Paint Tools for Win 7 and later.
Note: In Classic MS Paint there are 2 tools per row and they're aligned vertically. See image on the left.
|
 |
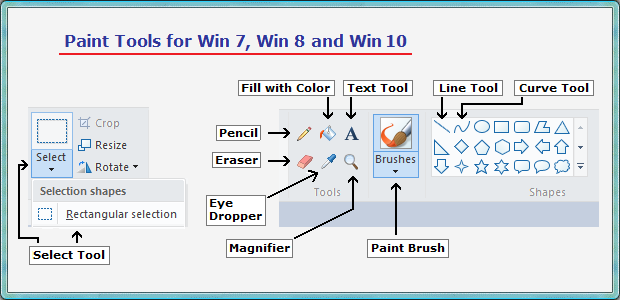
The first row contains the rectangular Select tool. It's the one on the right.
Second row includes the Eraser tool and the Fill with Color tool.
Third row has the Eye Dropper for picking colors, and the Magnifier tool.
Fourth row contains the Pencil and the Paint Brush tools.
Fifth row features the Text tool on the right for adding text to the image.
Sixth row includes the Line tool and the Curve tool.
These are the 10 basic tools we'll be using to draw our aircraft paint scheme.
In Win 7 and later we have the same tools, same icons, but at different locations.
|
How the Tools function :
Now that we know the names and where the Tools are located, let's see what we can do with each one.
Important Note: To use a tool, you need to click on it first to activate it.
1. The Select tool allows you to choose a rectangular area of the image so you can copy it, delete,
move,
rotate or fill it with color. It's very useful for modifying part of the
drawing without affecting the rest of it.
2. The Eraser tool works like a pencil eraser. Hold down the left mouse button and drag the pointer over the
area you want to erase.
3. The Fill with Color tool, or paint bucket, is for filling an enclosed shape with color. First you need to
choose a color from the palette, and then click inside the area you want to fill with that
color.
4. The Eye Dropper tool is used for grabbing a color from the image. Just click on any color in the image
and it
will become the color that you paint with.
5. The Magnifier tool is your friend and you'll use it a lot. For example,
if you want to set exactly where a line
begins and ends, you zoom in to mark the
beginning and to mark the end. Then you easily draw the line
between the two marks.
6. The Pencil tool is used for drawing freehand. Select a color from the palette, hold down the left
mouse
button and drag the pointer over the drawing area. A line will be drawn until
you release the mouse button.
7. The Paintbrush also works for drawing freehand, but the result is a thicker line or shape. You can select
from different shapes to draw with. Then drag the pointer over the drawing area.
8. The Text tool is for adding text to the drawing. It's good for adding your aircraft registration N-numbers
to the fuselage. You can try using different fonts and font sizes as well as
formatted text.
9. With the Line tool you can easily draw a straight line without messing up. It will be a straight line, not
squiggly like when using the pencil. Select a color and line thickness then drag the pointer.
10. The Curve tool is for drawing curves. Select a color and line thickness, then draw a straight line.
Now click
on the line where you want it to bend and drag the pointer perpendicular to the
line. A curve is drawn.
END OF "PART 1: Introduction to MS Paint"
The introduction to Microsoft Paint is now complete. We know where the basic tools are and how they work.
The next step is "PART 2: Beginning to Draw".
|

|
© Copyright 1998-2019, Model Airplane Color Design. All Rights Reserved.
All trademarks are trademarks of their respective owners.
|